
How to Create a Wedding Mood Board That Comes to Life
- May 10, 2025
- 4 min read
Updated: May 22
Most couples start planning their wedding with Pinterest boards full of dreamy inspiration photos… but somewhere between saving images and booking vendors, things can get disconnected. One photo has romantic garden vibes. Another feels modern and editorial. Then suddenly you’re wondering how all of these ideas are supposed to work together in one wedding day.
The truth is, a beautiful wedding mood board isn’t about copying Pinterest perfectly. It’s about creating a cohesive feeling that reflects you as a couple while also working with your venue, budget, season, and overall vision. Here’s how to create a wedding mood board that not only looks beautiful online, but comes to life on your wedding day.

Start With the Overall Feeling, Not Just the Colours
One of the biggest mistakes couples make when creating a wedding mood board is focusing only on colour palettes. Instead, start by thinking about how you want your wedding day to feel.
Do you want it to feel:
romantic and candlelit?
modern and editorial?
timeless and elegant?
soft and garden-inspired?
moody and dramatic?
relaxed and intimate?
Once you define the feeling first, your colour palette, rentals, florals, and overall styling choices become much easier to narrow down. Your mood board should communicate an atmosphere, not just a collection of random pretty photos.

Choose 3–5 Core Wedding Colours & Textures
Once you’ve established the overall vibe, start narrowing down your colours and textures.
The most cohesive weddings usually stick to:
3–5 main colours
a consistent texture palette
repeated materials throughout the day
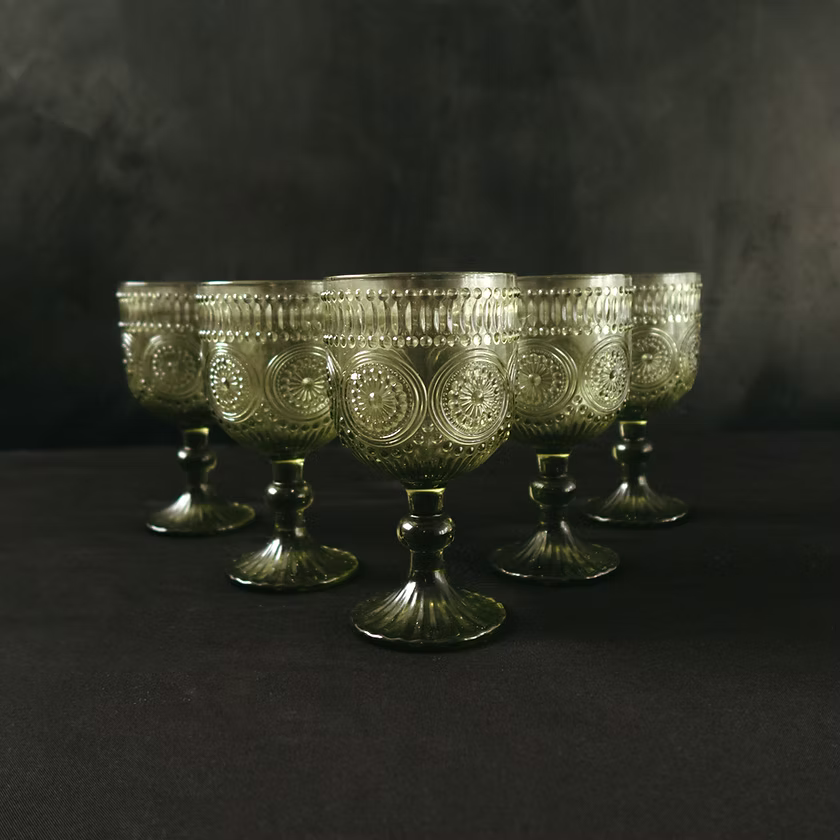
Textures make a huge difference when bringing a mood board to life. Mixing soft linens, candlelight, glassware, layered chargers, florals, and natural materials helps create dimension and visual interest without making the design feel overwhelming.
For example:
satin napkins create a polished elevated look
cheesecloth runners add softness and movement
ribbed glassware adds vintage-inspired texture
candles instantly make a space feel warm and intentional
The goal is to create consistency throughout your wedding design so every detail feels connected together.


Save Inspiration That Matches Your Actual Venue
Pinterest can be incredibly inspiring, but it’s important to save photos that realistically align with your wedding venue and season.
If your wedding is taking place in a rustic barn venue, an ultra-modern luxury ballroom inspiration photo may not fully translate the same way in real life, and that’s okay.This helps your wedding feel cohesive rather than disconnected from the actual space you’re getting married in.
Instead of copying exact weddings, focus on saving inspiration that reflects:
similar lighting
similar architecture
similar scenery
similar season
similar guest count
similar atmosphere

Focus on Repeating Details Throughout the Day
The weddings that feel the most intentional are usually the ones that repeat small details consistently throughout the day. When details repeat naturally throughout your ceremony, cocktail hour, and reception, the entire wedding begins to feel elevated and thoughtfully designed.
This could include:
repeating candle styles
matching black accents
consistent florals
similar textures
repeated colours
cohesive signage
consistent metal tones

Use Rentals to Bring Your Mood Board to Life
One of the easiest ways to transform inspiration photos into a real wedding design is through intentional rentals. Rentals help create consistency throughout your wedding while also elevating the overall guest experience.
At Oak & Ivory, some of the most impactful styling pieces couples use include:
cross back chairs
white folding chairs
charger plates
candles and candle holders
linens and runners
vintage-inspired glassware
table lamps
statement décor pieces
The right rentals can completely change how a space feels without requiring an overwhelming amount of décor.
Instead of purchasing dozens of one-time-use items, rentals allow couples to create a high-end, curated look while keeping the design cohesive and stress-free.


Pinterest Inspiration vs The Actual Wedding Day
One of the biggest misconceptions about wedding mood boards is thinking your wedding has to look identical to the inspiration photo for it to feel successful.
In reality, the most beautiful weddings take inspiration and reinterpret it in a way that feels personal and realistic for the couple, venue, and season.
Maybe your inspiration photos feature an Italian villa wedding, but your wedding is taking place in the prairies or mountains. That doesn’t mean you can’t still create the same romantic feeling.
The key is pulling inspiration from:
colour palettes
textures
lighting
atmosphere
floral styling
table design
overall emotion
rather than trying to recreate every exact photo perfectly.
The weddings that feel the most authentic are usually the ones that take inspiration and make it personal.


Creating a Wedding That Feels Like You
At the end of the day, your wedding mood board should feel like a reflection of you — not just a collection of trending Pinterest images.
The most memorable weddings are the ones that feel intentional, personal, and connected from beginning to end.
When colours, textures, rentals, florals, lighting, and styling details all work together, your wedding naturally feels elevated without needing to overcomplicate the design.
And often, it’s the smallest details that make the biggest impact.

Bringing Your Wedding Mood Board to Life
At Oak & Ivory Events, we help couples turn inspiration photos into wedding days that feel cohesive, elevated, and personal. From candles and linens to chairs, chargers, and curated décor rentals, every detail works together to create a wedding design that truly feels like you.
If you’re planning a wedding in Lloydminster, we’d love to help bring your vision to life.

